

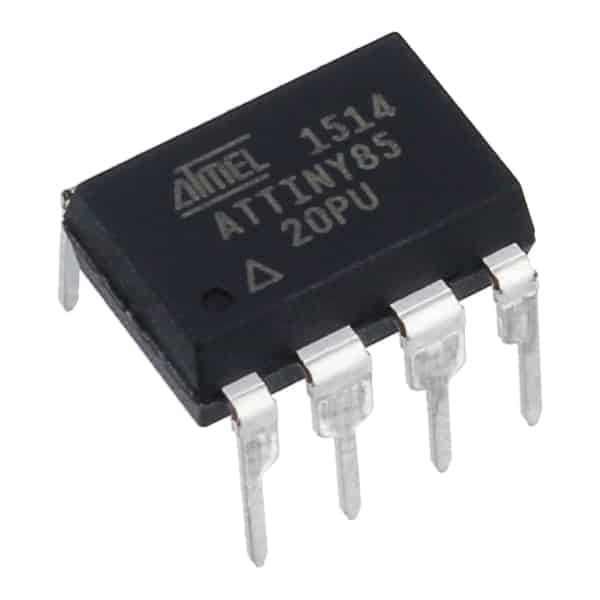
ATtiny85 is one of the smallest and most popular microcontrollers among the Arduino fans. But since you arrived on this page, you probably have some idea about electronics, so I won’t get into details. You can find the datasheet for ATtiny85 here. Also, you probably have some ATtiny85 module or just the chip and you are wondering how to program it.
Programming Digispark ATtiny85
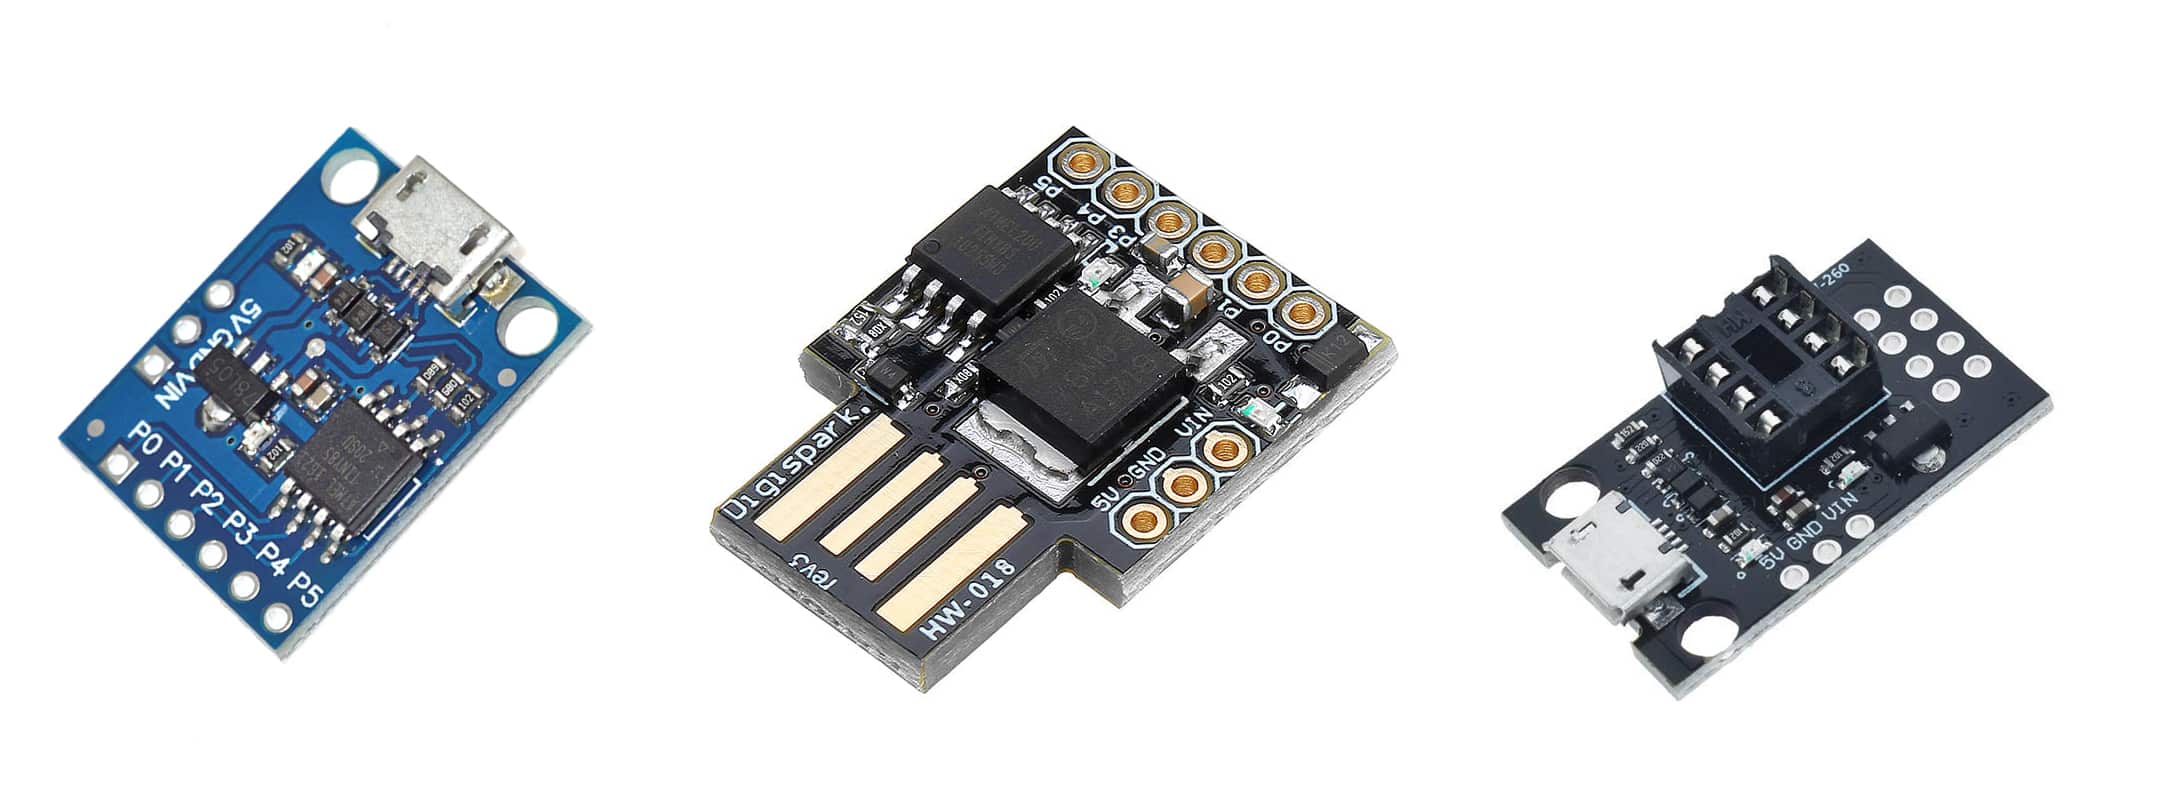
If you bought a development board that looks like the one in the image below, then you have a Digispark development board. These can be found on AliExpress for around 2$. One version comes with a microusb port and one with full usb port. There is also a DIP socket version, very useful for programming the DIP ATtiny85.
Usually, micronucleus firmware is already installed, which means you don’t need any extra hardware to program them. You basically compile your program, plug in your digispark and the program is written and starts executing. There are plenty of tutorials online and I am not going to write one as well. You can find a good example here and here.
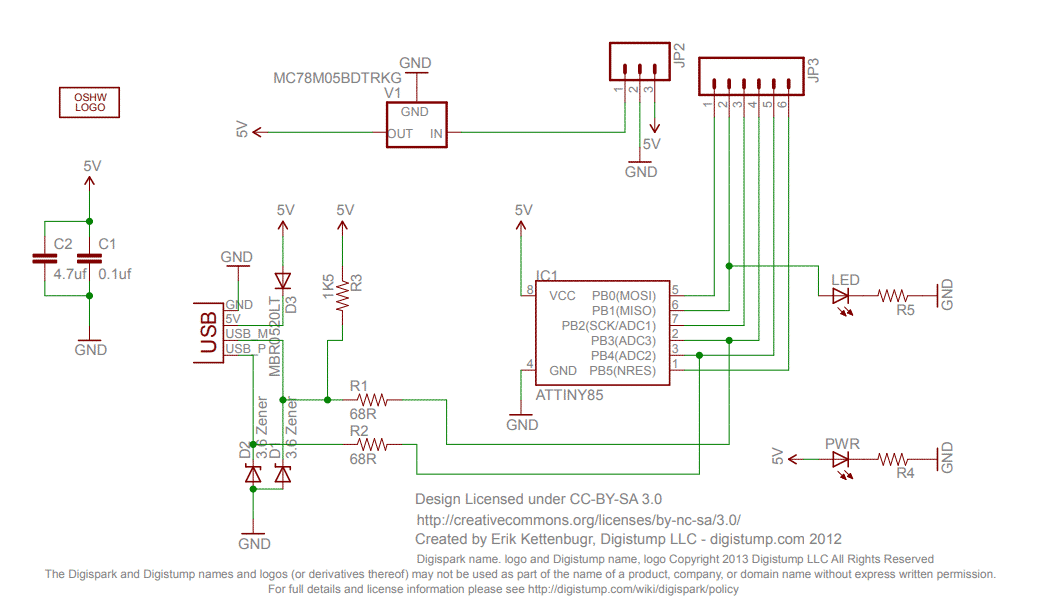
If you are planning to run your application on battery and you expect a long life, then these boards might not be good for you. If you look at the schematic you can see that these have a 5V voltage regulator, a power led and a led on GPIO1. These will consume a lot of power and reduce the battery life. For these situations I recommend you to buy the chip directly and create your own PCB.
On the plus side, the regulator allows you to connect this to a 9V battery without frying it. However, if you compare the capacity of a 9V battery and two or three AA or AAA batteries, you will see it’s not the best option.
Programming ATtiny85 with avrdude
If for some reason you purchased the DIP16 ATtiny85, you should be aware that these do not come with micronucleus and you need an AVR programmer to write them. The cheapest AVR programmer is around 2$ on AliExpress, but you can also use an Arduino UNO or RaspberryPi for this job.
To simplify your life, I recommend burning micronucleus on your chip and then program them as a digispark. Of course, micronucleus will occupy some memory space, but for simple applications you should have enough left to write your logic.
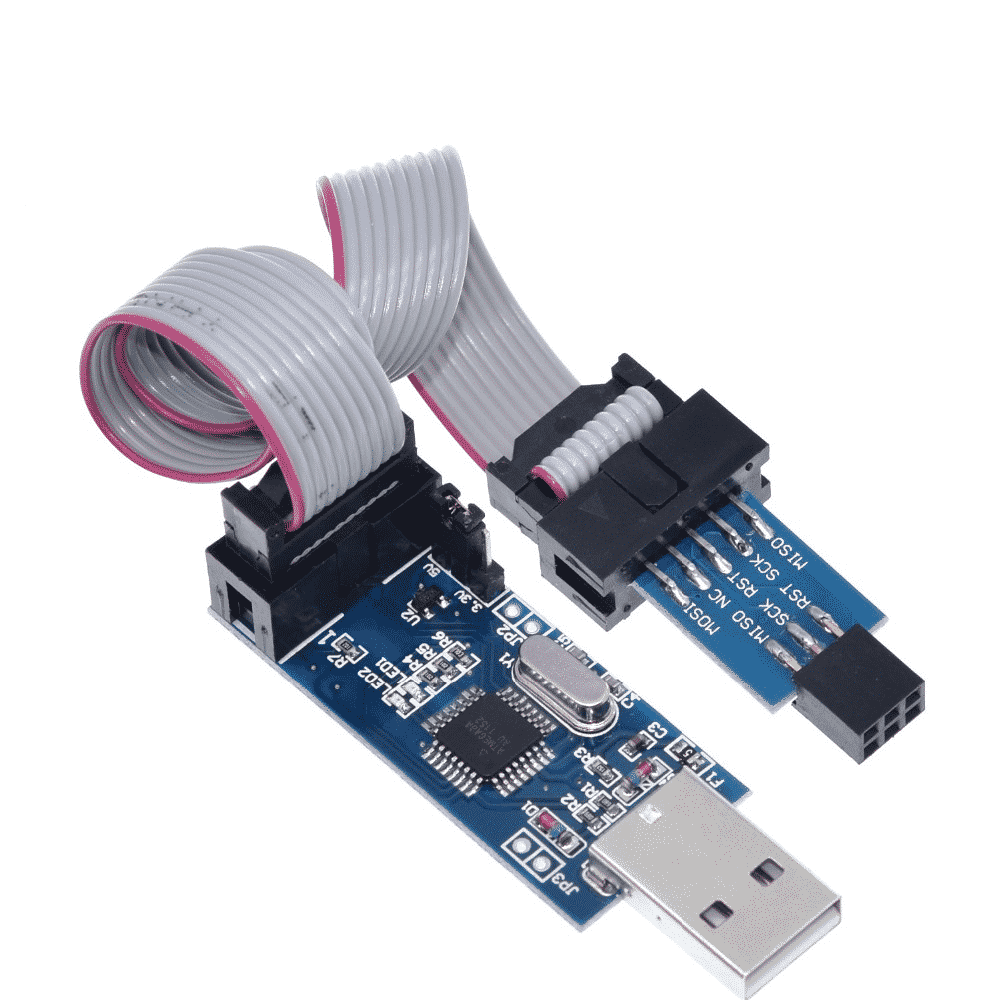
To install micronuleus on a naked ATtiny85 I am using this cheap AVR programmer from the image below. If you have the digispark DIP socket version with the 8 pin header installed, you can just plug the 6 pin socket into it. The bottom 2 pins should be unconnected, so just make sure the 5V pin matches.
On Ubuntu Linux this should be detected automatically as USBasp.
[142658.448715] usb 1-2: New USB device found, idVendor=16c0, idProduct=05dc, bcdDevice= 1.02
[142658.448721] usb 1-2: New USB device strings: Mfr=1, Product=2, SerialNumber=0
[142658.448725] usb 1-2: Product: USBasp
[142658.448728] usb 1-2: Manufacturer: www.fischl.de
Also, you need avrdude that can be easily installed with sudo apt install avrdude
Run the highlighted commands below to upload micronucleus to ATtiny85.
➜  /tmp git clone https://github.com/micronucleus/micronucleus.git
Cloning into 'micronucleus'...
remote: Enumerating objects: 2679, done.
remote: Total 2679 (delta 0), reused 0 (delta 0), pack-reused 2679
Receiving objects: 100% (2679/2679), 8.38 MiB | 9.53 MiB/s, done.
Resolving deltas: 100% (1600/1600), done.
➜  /tmp cd micronucleus/firmware
➜  firmware git:(master) make fuse
avrdude -c USBasp -p attiny85  -U lfuse:w:0xe1:m -U hfuse:w:0xdd:m -U efuse:w:0xfe:m -B 20

avrdude: set SCK frequency to 32000 Hz
avrdude: warning: cannot set sck period. please check for usbasp firmware update.
avrdude: AVR device initialized and ready to accept instructions

Reading | ################################################## | 100% 0.00s

avrdude: Device signature = 0x1e930b (probably t85)
avrdude: reading input file "0xe1"
avrdude: writing lfuse (1 bytes):

Writing | ################################################## | 100% 0.00s

avrdude: 1 bytes of lfuse written
avrdude: verifying lfuse memory against 0xe1:
avrdude: load data lfuse data from input file 0xe1:
avrdude: input file 0xe1 contains 1 bytes
avrdude: reading on-chip lfuse data:

Reading | ################################################## | 100% 0.00s

avrdude: verifying ...
avrdude: 1 bytes of lfuse verified
avrdude: reading input file "0xdd"
avrdude: writing hfuse (1 bytes):

Writing | ################################################## | 100% 0.00s

avrdude: 1 bytes of hfuse written
avrdude: verifying hfuse memory against 0xdd:
avrdude: load data hfuse data from input file 0xdd:
avrdude: input file 0xdd contains 1 bytes
avrdude: reading on-chip hfuse data:

Reading | ################################################## | 100% 0.00s

avrdude: verifying ...
avrdude: 1 bytes of hfuse verified
avrdude: reading input file "0xfe"
avrdude: writing efuse (1 bytes):

Writing | ################################################## | 100% 0.00s

avrdude: 1 bytes of efuse written
avrdude: verifying efuse memory against 0xfe:
avrdude: load data efuse data from input file 0xfe:
avrdude: input file 0xfe contains 1 bytes
avrdude: reading on-chip efuse data:

Reading | ################################################## | 100% 0.00s

avrdude: verifying ...
avrdude: 1 bytes of efuse verified

avrdude: safemode: Fuses OK (E:FE, H:DD, L:E1)

avrdude done.  Thank you.

➜  firmware git:(master) make flash
Building Micronucleus configuration: t85_default
Size of sections:
   text	   data	    bss	    dec	    hex	filename
   1588	      0	     44	   1632	    660	main.bin
Size of binary hexfile. Use the data size to calculate the bootloader address:
   text	   data	    bss	    dec	    hex	filename
      0	   1588	      0	   1588	    634	main.hex
avrdude -c USBasp -p attiny85  -U flash:w:main.hex:i -B 20

avrdude: set SCK frequency to 32000 Hz
avrdude: warning: cannot set sck period. please check for usbasp firmware update.
avrdude: AVR device initialized and ready to accept instructions

Reading | ################################################## | 100% 0.00s

avrdude: Device signature = 0x1e930b (probably t85)
avrdude: NOTE: "flash" memory has been specified, an erase cycle will be performed
         To disable this feature, specify the -D option.
avrdude: erasing chip
avrdude: set SCK frequency to 32000 Hz
avrdude: warning: cannot set sck period. please check for usbasp firmware update.
avrdude: reading input file "main.hex"
avrdude: writing flash (8116 bytes):

Writing | ################################################## | 100% 0.00s

avrdude: 8116 bytes of flash written
avrdude: verifying flash memory against main.hex:
avrdude: load data flash data from input file main.hex:
avrdude: input file main.hex contains 8116 bytes
avrdude: reading on-chip flash data:

Reading | ################################################## | 100% 0.00s

avrdude: verifying ...
avrdude: 8116 bytes of flash verified

avrdude: safemode: Fuses OK (E:FE, H:DD, L:E1)

avrdude done.  Thank you.
If you don’t have all the libraries and programs required to compile the hex file, you can find the precompiled hex in the releases folder. Then you just have to run:
➜  firmware git:(master) cd releases
➜  releases git:(master) ls
m328p_extclock.hex  t167_default.hex  t841_default.hex  t85_aggressive.hex
Nanite841.hex       t45_default.hex   t84_default.hex   t85_default.hex
➜  releases git:(master) avrdude -c USBasp -p attiny85 -U lfuse:w:0xe1:m -U hfuse:w:0xdd:m -U efuse:w:0xfe:m -B 20


avrdude: set SCK frequency to 32000 Hz
avrdude: warning: cannot set sck period. please check for usbasp firmware update.
avrdude: AVR device initialized and ready to accept instructions

Reading | ################################################## | 100% 0.00s

avrdude: Device signature = 0x1e930b (probably t85)
avrdude: reading input file "0xe1"
avrdude: writing lfuse (1 bytes):

Writing | ################################################## | 100% 0.00s

avrdude: 1 bytes of lfuse written
avrdude: verifying lfuse memory against 0xe1:
avrdude: load data lfuse data from input file 0xe1:
avrdude: input file 0xe1 contains 1 bytes
avrdude: reading on-chip lfuse data:

Reading | ################################################## | 100% 0.00s

avrdude: verifying ...
avrdude: 1 bytes of lfuse verified
avrdude: reading input file "0xdd"
avrdude: writing hfuse (1 bytes):

Writing | ################################################## | 100% 0.00s

avrdude: 1 bytes of hfuse written
avrdude: verifying hfuse memory against 0xdd:
avrdude: load data hfuse data from input file 0xdd:
avrdude: input file 0xdd contains 1 bytes
avrdude: reading on-chip hfuse data:

Reading | ################################################## | 100% 0.00s

avrdude: verifying ...
avrdude: 1 bytes of hfuse verified
avrdude: reading input file "0xfe"
avrdude: writing efuse (1 bytes):

Writing | ################################################## | 100% 0.00s

avrdude: 1 bytes of efuse written
avrdude: verifying efuse memory against 0xfe:
avrdude: load data efuse data from input file 0xfe:
avrdude: input file 0xfe contains 1 bytes
avrdude: reading on-chip efuse data:

Reading | ################################################## | 100% 0.00s

avrdude: verifying ...
avrdude: 1 bytes of efuse verified

avrdude: safemode: Fuses OK (E:FE, H:DD, L:E1)

avrdude done.  Thank you.

➜  releases git:(master) avrdude -c USBasp -p attiny85 -U flash:w:t85_default.hex:i -B 20

avrdude: set SCK frequency to 32000 Hz
avrdude: warning: cannot set sck period. please check for usbasp firmware update.
avrdude: AVR device initialized and ready to accept instructions

Reading | ################################################## | 100% 0.00s

avrdude: Device signature = 0x1e930b (probably t85)
avrdude: NOTE: "flash" memory has been specified, an erase cycle will be performed
         To disable this feature, specify the -D option.
avrdude: erasing chip
avrdude: set SCK frequency to 32000 Hz
avrdude: warning: cannot set sck period. please check for usbasp firmware update.
avrdude: reading input file "t85_default.hex"
avrdude: writing flash (8116 bytes):

Writing | ################################################## | 100% 0.00s

avrdude: 8116 bytes of flash written
avrdude: verifying flash memory against t85_default.hex:
avrdude: load data flash data from input file t85_default.hex:
avrdude: input file t85_default.hex contains 8116 bytes
avrdude: reading on-chip flash data:

Reading | ################################################## | 100% 0.00s

avrdude: verifying ...
avrdude: 8116 bytes of flash verified

avrdude: safemode: Fuses OK (E:FE, H:DD, L:E1)

avrdude done.  Thank you.
Debugging ATtiny85
One important characteristic of this microchip is that it doesn’t have a serial port. If you just want to blink a led or control a relay, then you might think you don’t need serial communication. Well, serial communication is usually used for debugging and printing log on your console. So your arduino Serial.println() is not gonna work. However, there is a solution. ATTiny85 can act as a keyboard, so you can use it to write your debugging text as keyboard inputs. You basically have to open any editor or textbox, plug in your ATtiny to USB port and it will start writing debugging text to the file. You can find more information here.
This is the easiest example. Printing a message every 1s.
#include "DigiKeyboard.h"*/

void setup() {
  // put your setup code here, to run once.
}

void loop() {
  delay(1000);
  DigiKeyboard.println("My debug message: ONE SECOND PASSED");
}